New Front Panel Overlay coming for JD-XA
-
richardbates1

- Posts: 389
- Joined: 19:58, 19 July 2013
Re: New Front Panel Overlay coming for JD-XA
Just let me know when I can purchase and how?
Re: New Front Panel Overlay coming for JD-XA
HI
it's beautifull !!
it seems that the background color is no black, it's only a test ?
it's beautifull !!
it seems that the background color is no black, it's only a test ?
-
SynthGraphics
- Posts: 104
- Joined: 23:06, 3 November 2015
Re: New Front Panel Overlay coming for JD-XA
The background will be solid black. The translucant photo you see is the test die cut - I use a translucent mylar so I can see items under the test cut for reference.Redrain68 wrote:HI
it's beautifull !!
it seems that the background color is no black, it's only a test ?
-
DWareham02

- Posts: 85
- Joined: 23:38, 22 October 2015
- Location: Bonita Springs, Florida
- Contact:
Re: New Front Panel Overlay coming for JD-XA
I love it. The overlay looks wonderful. I think it's just what we all want.
Question: What is the finish of the overlay. Is it super reflective like the real keyboard? Or is it glare free?
I think Glare Free would be preferred. JMHO
Thanks for a great job SynthGraphics.... Very Well Done!!!
Question: What is the finish of the overlay. Is it super reflective like the real keyboard? Or is it glare free?
I think Glare Free would be preferred. JMHO
Thanks for a great job SynthGraphics.... Very Well Done!!!
-
SynthGraphics
- Posts: 104
- Joined: 23:06, 3 November 2015
Re: New Front Panel Overlay coming for JD-XA
It's a matte finish so no glare. If you have seen a modern Moog (Voyager, Sub-37, Phatty) or a Prophet-08 front panel I use the exact same printing process, materials, and finish. So that will give you a idea of the finished look and quality. Extremely tough stuff!DWareham02 wrote:I love it. The overlay looks wonderful. I think it's just what we all want.
Question: What is the finish of the overlay. Is it super reflective like the real keyboard? Or is it glare free?
I think Glare Free would be preferred. JMHO
Thanks for a great job SynthGraphics.... Very Well Done!!!
-
SynthGraphics
- Posts: 104
- Joined: 23:06, 3 November 2015
Re: New Front Panel Overlay coming for JD-XA
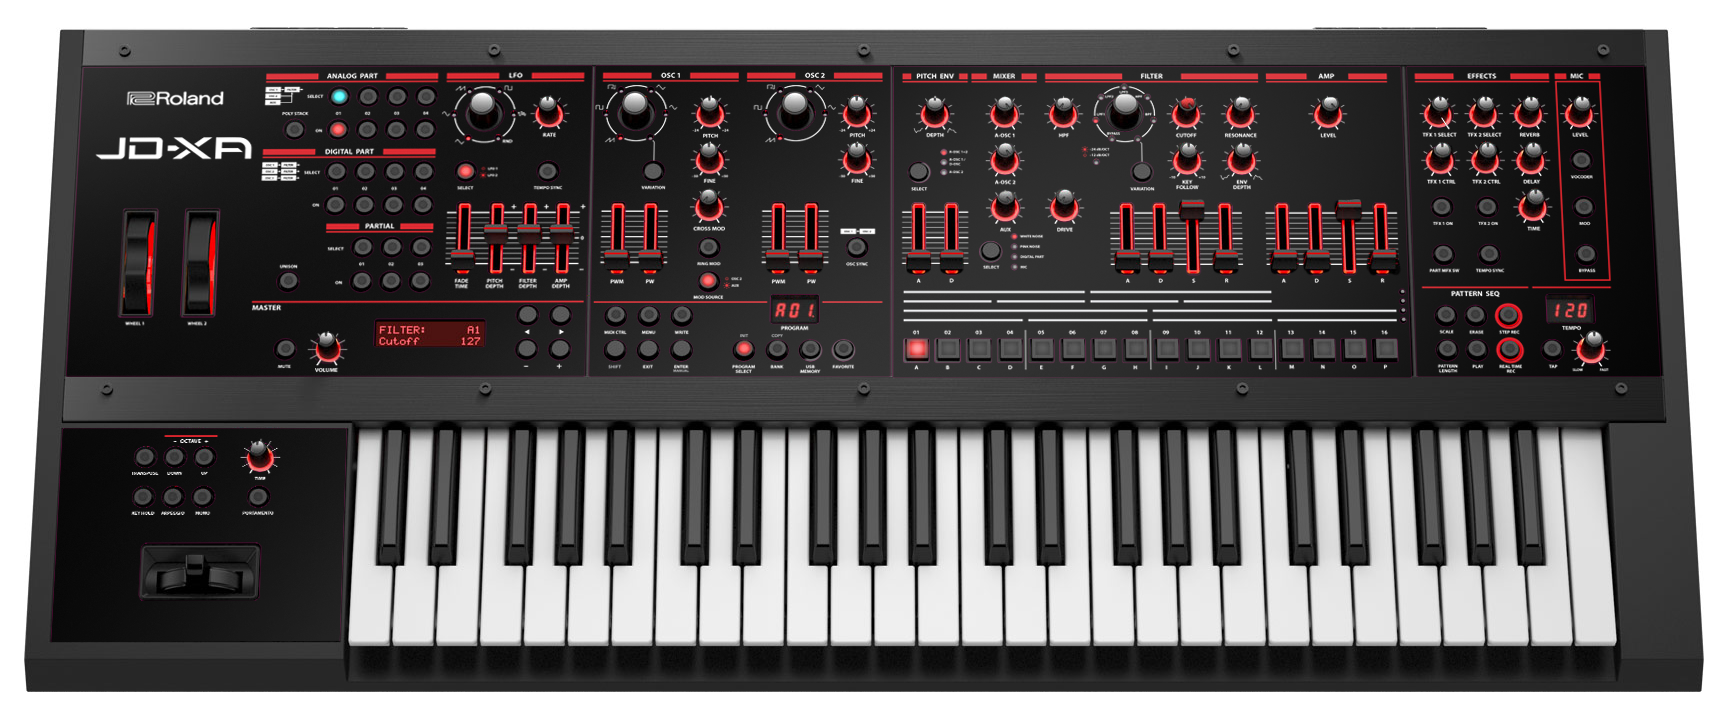
Here's a quick mockup in Photoshop.
Larger view
http://www.synthgraphics.com/images/JD- ... OCK-UP.png

Larger view
http://www.synthgraphics.com/images/JD- ... OCK-UP.png
-
richardbates1
- Posts: 389
- Joined: 19:58, 19 July 2013
Re: New Front Panel Overlay coming for JD-XA
I can't wait for the new panel graphics!!!
Now I think in the future I will try to replace the Frankenstein bolts that they used on the area around the panel, it has a look of an old Chevy from the 50's.
I love this synth, inside this beast is a remarkable synth!!
But the Roland visual graphics team that designed the overall look of the JDXA in my opinion really, really, really blew it!
They never took the user in mind.......they put their vision of form over function, and function meaning the user's ability to read the panel......very simple concept.
Thanks Synthgraphics for the new design!
You should replace the Roland hardware graphics design team!
-
Synth Guru
- Posts: 134
- Joined: 19:43, 11 July 2015
- Contact:
Re: New Front Panel Overlay coming for JD-XA
That really looks magnificent! Great job Jamie!
You banged out that graphic really fast, hat's off to your talent! :)
You banged out that graphic really fast, hat's off to your talent! :)
-
hermanis922
- Posts: 7
- Joined: 18:50, 5 September 2015
Re: New Front Panel Overlay coming for JD-XA
Just got this synth today and its already full of dust and fingerprints :D
Re: New Front Panel Overlay coming for JD-XA
Hi synthgraphics:
Great idea!
Make it available as soon as possible and i will order it in france without doubt for my JDXA
Let us know the process.
Thanks a lot!
Great idea!
Make it available as soon as possible and i will order it in france without doubt for my JDXA
Let us know the process.
Thanks a lot!

Re: New Front Panel Overlay coming for JD-XA
Superb work SynthGraphics!SynthGraphics wrote:Here's a quick mockup in Photoshop.
Larger view
http://www.synthgraphics.com/images/JD- ... OCK-UP.png
Sorry to be off-topic, but do you have plans to produce a similar skin for the JD-Xa's little brother, JD-Xi ?
Thanks
PauloF
-
SynthGraphics
- Posts: 104
- Joined: 23:06, 3 November 2015
Re: New Front Panel Overlay coming for JD-XA
Here are JD-XA SHIFT parameters
SHIFT + Cutoff = Cutoff Fine -50 to +50
SHIFT + Key Follow = Key Follow Fine -50 to +50
SHIFT + ENV Depth = Velocity Amount -63 to +63
SHIFT + VCA = Velocity Amount -63 to +63
SHIFT + Pitch ENV = Velocity Amount -63 to +63
SHIFT + OSC Sync = OSC Phase Sync
SHIFT + LFO Tempo Sync = LFO Key Trigger
SHIFT + Octave Transpose +/- = Tone (Part) Octave -3 to +3
Digital Only
SHIFT + OSC Pitch = AMP Pan L64 to R64
Since the manual is extremely basic, I actually stumbled across this and then looked for every SHIFT parameter I could. My new overlay will include them so you SEE them on the panel for easier editing.
Please let me know if anyone else knows of more - I tried to find as many as possible.
Re: New Front Panel Overlay coming for JD-XA
I want one, when its gone be ready for delivery?
Cheers
Jack
Cheers
Jack
Re: New Front Panel Overlay coming for JD-XA
16
List of Shortcut Keys
Shortcut
Explanation
Part
[Shift]+ Part On [01]–[04]
Turns part mute on/off (p. 4).
[Arpeggio]+ Part On [01]–[04]
Turns each part’s Arpeggio Sw on/off (p. 9).
[Vocoder]+ Part On [01]–[04]
Turns each part’s Vocoder Send Sw on/off.
Press Part On [01]–[04] + keyboard
twice (to specify the lower and
upper limit)
Specifies the key range of each part.
Controllers
[Shift]+[Modulation] lever
Enters the Modulation LFO setting state.
To exit this state, use [Shift] + [Modulation] lever once
again.
[Shift] + operate Wheel 1
Displays the Wheel 1 assignment (p. 12).
[Shift] + operate Wheel 2
Displays the Wheel 2 assignment (p. 12).
[Shift]+ operate Pedal 1
Displays the Pedal 1 assignment (p. 12).
[Shift]+ operate Pedal 2
Displays the Pedal 2 assignment (p. 12).
Common section
[Exit] + controller
Displays the parameter (the value does not change).
[-], [+]
Hold down one button while pressing the other button to
make the value change rapidly.
[Shift]+[-] [+]
Makes the value change more greatly.
[Shift]+[
K
] [
J
]
Moves to the previous/next parameter section.
[Shift]+[MIDI CTRL]
Turns trigger mode on/off (p. 11).
[Shift]+[Menu]
Display Lock on/off.
If this is on, the corresponding parameter is not displayed
when you move a controller (the value is changed).
[Shift]+[Write]
Displays the LED Customize screen (p. 15).
[Shift]+[Enter]
Executes the Manual function (p. 2).
[Shift]+[Program Select]
Displays the Init screen (p. 7).
(In the Arpeggio Edit screen, initializes the arpeggio
pattern.)
[Shift]+[Bank]
Displays the Copy screen (p. 7).
[Shift]+[Favorite]
Displays the Favorite Util screen (p. 7).
[Program Select]+[01]–[16]
Selects a program
[Bank]+[01]–[16]
Normally:
Switches the program bank (p. 4).
Favorites:
Switches the favorite bank (p. 7).
[Favorite]+[01]–[16]
Registers the current program number as a favorite
(p. 7).
LFO
[Shift]+ [Tempo Sync]
Analog part:
Turns LFO Key Trigger on/off.
Digital part:
Turns LFO Key Trigger on/off.
[Shift]+ [AMP Depth]
Analog part:
No function.
Digital part:
Adjusts LFO Pan Depth.
OSC1
[Shift]+[Pitch]
Analog part:
No function.
Digital part:
Adjusts AMP Pan.
Part Select [01]–[04]+[Pitch]
Adjust the pan of each part.
[Shift]+[PW]
Analog part:
No function.
Digital part:
Adjusts OSC PW Shift (Pulse Width Shift).
PITCH ENV
[Shift]+[Depth]
Analog part:
Adjusts Pitch Env Velo Sens (Velocity Sens).
Digital part:
No function.
FILTER
[Shift]+[Cutoff ]
Analog part:
Adjusts FILTER Cutoff Fine.
Digital part:
No function.
[Shift]+[Key Follow]
Analog part:
Adjusts FILTER KF Fine (Key Follow Fine).
Digital part:
No function.
[Shift]+[Env Depth]
Analog part:
Adjusts FILTER Velo Sens (Velocity Sens).
Digital part:
Adjusts FILTER Velo Sens (Velocity Sens).
AMP
[Shift]+[Level]
Analog part:
Adjusts AMP Velo Sens (Velocity Sens).
Digital part:
Adjusts AMP Velo Sens (Velocity Sens).
Part Sel [01]–[04]+[AMP Level]
Adjust the volume of each part.
EFFECTS
[Shift]+[TFX 1 On]
Displays the TFX 1 screen (TFX1 Sw setting does not
change).
[Shift]+[TFX 2 On]
Displays the TFX 2 screen (TFX2 Sw setting does not
change).
[Shift]+[Part MFX On]
Displays the Part MFX screen (Part MFX Sw setting does not
change).
Shortcut
Explanation
PATTERN SEQ
[Shift]+[01]–[16]
[Pattern Length]+[01]–[16]
Use the [01]–[16] buttons to move the region (measures) of
performance data that is displayed (p. 8).
[01]–[16] + knob
(during Step REC2)
Records the knob operation at the specified step (position)
(p. 8).
Keyboard + [01]–[16]
(during Step REC2)
Records the keyboard note at the specified step (position).
[Shift]+[Erase]
Displays the Pattern Erase menu (p. 9).
[Erase]+Part On [01]–[04]
Displays the Pattern Erase menu and assigns the specified
part as the target for erasure (p. 9).
[Erase]+[01]–[16]
Erases the all recorded data included in the specified step
of the applicable Step REC part (p. 8).
[Erase] + knob
During Realtime Erase:
Assigns the knob data as the target
for erasure (p. 8).
[Shift]+[Step REC]
Displays the Step REC setting screen (p. 8).
(The Step REC status does not change)
[Shift]+[Realtime REC]
Displays the Realtime REC setting screen (p. 8).
(The Realtime REC status does not change)
[Shift]+[Tap]
Displays the tempo parameter.
At the left side of the keyboard
[Shift]+OCTAVE [Up] [Down]
Sets Tone Common Oct Shift (Octave Shift).
[Shift]+[Key Hold]
Switches the Kbd Velocity setting (Real
,
fixed value
(default:127)) (p. 12).
[Shift]+[Arpeggio]
Displays the arpeggio screen (p. 9).
(The arpeggio switch does not change)
&
For details on the paramete
-
richardbates1
- Posts: 389
- Joined: 19:58, 19 July 2013
Re: New Front Panel Overlay coming for JD-XA
Synthgraphics, is there an area on your website where we can pre-order the JDXA panel graphics?